Using Human Interaction in a Case Model |
|
Before you begin this task:
Create a User Interface (XForm).
You need an XForm to attach it to an activity in a case model when you want to call an external Web service or use it to perform a manual task.
- Do any one of the following:
- Select a starting point and click
 (Case Model) to open an existing case model. The case model appears.
 - If the case model is already opened, then perform step 2.
- Select a starting point and click
- Drag required <User Interface> from the Workspace Documents > <Solution> > <Project> content tree on to required State in the case model. Alternatively, drag the Activity construct on to the required State and then drag-drop the <User Interface> from the Workspace Documents > <Solution> > <Project> on to that Activity. The required task User Interface is attached to the case model and a delivery model is created for the User Interface.
- Double-click the User Interface activity in the case model. Alternatively, right-click the activity and select Properties. The Activity Properties - New Activity pane appears.
- Set the properties of the User Interface/human activity as required.
- Click
 .
. - Right-click in the case modeler and select Execution > Validate. Alternatively, go to Workspace Documents > <Solution> > <Project>, right-click the case model and select Execution > Validate. If there are no warnings, a status message appears indicating that there are no warnings. If there are warnings, resolve the errors and re-validate the case model.
- Right-click in the case modeler and select Execution > Publish to Organization. Alternatively, go to Workspace Documents > <Solution> > <Project> , right-click the case model and select Execution > Publish to Organization. The case model is published to organization.
- Right-click in the case modeler and select Execution > Run. Alternatively, go to Workspace Documents > <Solution> > <Project> , right-click the case model and select Execution > Run. The case model is instantiated.
The required Task is used in a case model.
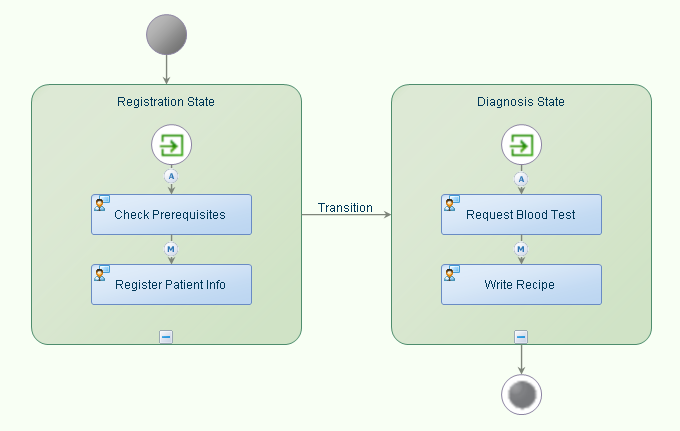
Sample Case Model Using an XForm
- Create the following tasks - CheckPrerequisites, RegisterPatientInfo, RequestBloodTest, and WriteRecipe.
- Go to Workspace Documents > <Solution>, right-click the <Project> and select New > Other. From the New Process Platform Document dialog, select Case Management Model.
- Design a case model PatientRegistration as shown in the diagram below to create the Intial State, Registration State, Diagnosis State and Final State.
- From Workspace Documents > <Solution> > <Project> drag and drop the created tasks corresponding to the activity names as shown in the diagram below. Required tasks are appropriately attached to the case model.
- From the Case Toolbar, drag the
 (On Entry) construct and connect it to the Check Prerequisites and Request Blood Test activities in respective States as shown in the diagram.
 - From the Case Toolbar, drag the Transition connector to show transition from one State to another as shown in the diagram.
- Set the properties of each User Interface/human activity in the case model.
- Click .
- Perform the Steps 6 through Step 8 as described in the main procedure above.